template

Tuesday, March 8, 2011

Mercer Manor is finally a reality!

Hi guys! As you know, Tyler & I closed on our house a couple of weeks ago!!
Yay! We've been waiting for this day for sooooo long!
Through the ups & downs, I wouldn't change a. single. thing.
Unfortunately, we weren't able to move in immediately because of the long list
of things we wanted to update. 
I mean LOOOOOONG list.
Nonetheless, this experience has been very exciting. 
Here are some pics of the house before we started our remodel projects. 
Keep an open mind! It'll all be so different once we're done with it!

Sorry, I haven't taken a picture of the front of the house, but I will!


This is the front door & small entryway. 
The tile is gone and the walls have been painted "water chestnut." 
We picked out a beautiful laminate that will go everywhere except the work out room, guest bedrooms & closets.

The entryway closet. 

Just off of the entryway is the laundry room & garage conversion 
that will serve as our work out/music room.

This is the view from the laundry room door. 

The old mantle is being tossed out & we are replacing it with a 
beautiful antique fireplace surround. I can't wait!! 


Our list is especially long in the kitchen.
The wall to the left is gone now. In it's place is an island.
The cabinets will be painted white & the ugly blue 
laminate countertops will be replaced with a dark stone of some sort.

I can't wait for the blue to be gone & our new appliances to arrive!

Bye-bye nasty microwave & stove! Hasta la vista!

This freakishly ugly light is already gone. I couldn't stand it! 
Instead we are installing 5 can lights in the ceiling.


Here's our little breakfast area. 
I recently acquired a FREE table with 2 leaves & 6 chairs that I will be refinishing. 
I love free.

I haven't decided about the chandelier yet. It could work with just a couple coats of paint.
What do you think?

View down the hallway. 
To the left is the guest bath, to the right is a guest bed, straight ahead is a guest bed,
& on the far left is the master bed.
The walls are all the same "water chestnut." 
Right now the floor is just concrete, but soon they will be beautiful!

 
Guest bathroom.
The tub and surround is in really good shape, so it stays.
The toilet & pedestal sink are g.o.n.e though.

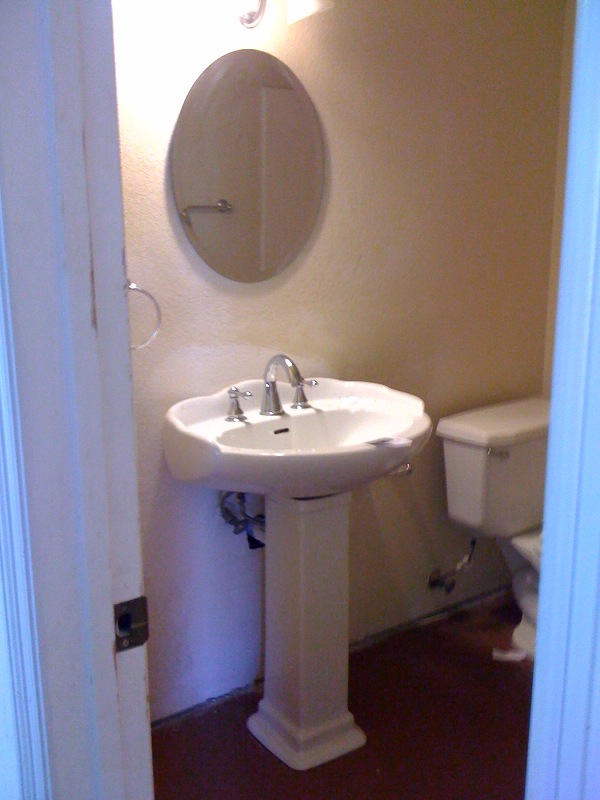
We are replacing the sink with a dresser turned vanity.

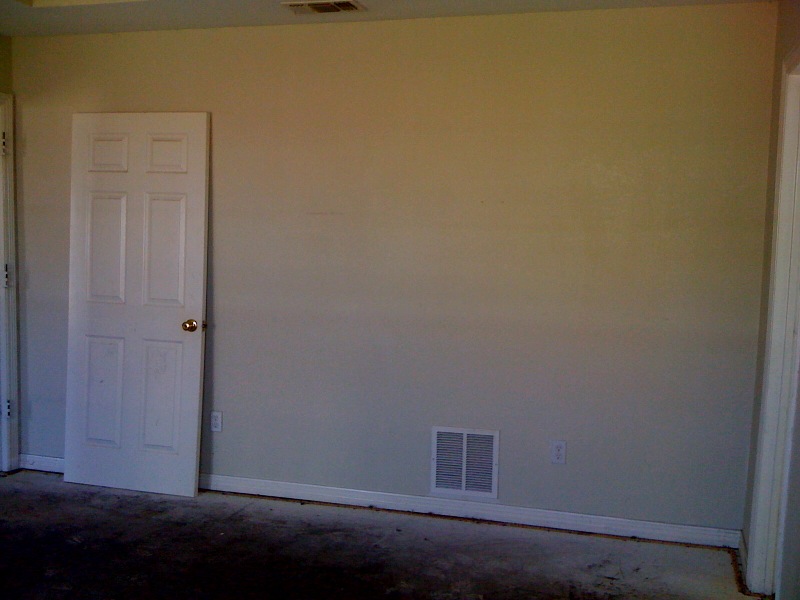
This is what we call the brown room.
It had glitter paint all over the walls & doors. 
Just a quick sanding got it off & a couple coats of Kilz removed any evidence.
We are putting carpet in here. 

And now, the pink room.
Need I say more?
Who paints a ceiling hot pink??
Oh yeah, the same people who let their children write on walls with glitter plaint
& markers!
The ugly gray carpet is gone & we will replace it with a new beautiful neutral carpet.

This is the master bedroom. 
Sorry the pictures are horrible. It's hard to get a good shot of the whole room.

We are continuing the laminate in here as well.

It has a tray ceiling.
One day I will replace all of the light fixtures in the house, but
thats not high on the list right now.
Priorities.

The master bath vanity will be sanded and painted white probably.
A new countertop will complete the look.

The walls have been painted "Barely Jade." 
It's a beautiful light blue green.

A new toilet will make this area a lot more inviting. ;)

Ah, the garden tub. The blue marble will be replaced with a neutral tile.

Well, that's all of the before pictures. 
Stay tuned for some afters!!


Tuesday, February 1, 2011

All you need is LOVE!

Hi guys!
I know, I know. Shame on me for being a horrible blogger. 
IF you can even give me such a title. I'd say I'm more of a sporadic "poster". 
Yeah. Sporadic. That gives me a little wiggle room, right?

I do promise that I haven't forgotten about you!
I've recently gotten back into my craft swing, but there's not much time to blog post...
So I have some great posts coming up! 

First up is a remake of this AMAZING poster:


Of course, I didn't make it exactly like the one in the photo above. That would be plagiarism. Instead I got the idea from the picture and made mine similar but different.

I didn't take step-by-step photos. Probably because I forgot it's really simple to make. :)

I bought a matted frame from Ross for $5. 
(I thought this was a great deal for an 16"x20" frame! Yeah baby!)

Here it is before:


Not the most attractive picture, I'd say. 
But, beauty is in the eye of the beholder. :)

And now, my finished word art!


Here's how I did it:
Since it was not intended to be used as a frame that you can change the picture out, I had to rip off the paper that was covering the back of it.
Once that was done, I removed all of the staples there were holding the back of the frame to the frame itself. This was quite the task. Enter my handyman father-in-law.
I'm not afraid to say it. I ask for assistance whenever I need it. 
Besides, I had just gotten my nails done. :)

Once I had removed the ugly original picture that was in the frame, I laid out my scrapbook paper inside of the mat. Once I got the layout the way I wanted it, I drew out the letters L,O,V & E. 
You could even print them off of the computer. It'd probably be easier, but I had some extra time on my hands.
Then, I cut out the letters and placed them on the scrapbook paper. 

Easy, peasy. So easy, I probably didn't even need to post the instructions!


Well, hasta luego! 


Sunday, December 12, 2010

Pretty, Pretty Vases

Howdy all!

Sorry it's been so long since my last post. What with recently moving & Christmas quickly approaching I've been pretty busy. But I'm most certainly not complaining. :)

Now, I don't know about you but I LOOOOVVE Christmas decorations. Among my favorites are sparkly glass & the glow from Christmas lights/candles. The glow of the Christmas tree on a cold evening with the scent of cookies baking in the oven takes me back to my childhood.

I have an incredibly easy project that will only cost you $4 big ones. You can't even buy a meal for that these days (unless you go to your local Taco Bell)! 

You'll need 5 things:
2 glass candlestick holders
2 glass vases
Gorilla glue

I got my candlestick holders & vases at Dollar Tree. But if you already have some then it's that much cheaper! :)

All you have to do is glue the candlestick holder to the bottom of the vases. 
That's. It.
You'll be amazed at the result!


I haven't decorated mine yet. I can picture a ribbon tied around the vase & perhaps some Christmas lights inside or battery-operated candles. Ah, did I mention how much I love Christmas?


Wednesday, November 17, 2010

The Big Reveal!

Hello, loyal followers (a.k.a family members)!
I hope you are all having a wonderful week thus far. I know I am! 
I'm finally packing everything up in R.L.! We're moving back to central Texas early next week. 
Woo-hoo!! Happy dance!

I really have enjoyed our time out here. It's been good for our first year of marriage & a great opportunity for Tyler. And we have met some of the nicest people. Ever. 
(We'll miss you, Washams!!)

So, needless to say, I've been pretty busy. Sorry for the delay.
But the day has come for you to find out what in the world the mystery piece is. 
Here's the mystery photo one more time...
Drum-roll please......

 It's a luggage stand! 

When I first laid eyes on her, I knew I had to have her! We were meant to be.
When I got her home, she was pretty dusty. So, I wiped her down & made that wood shine!

Then I took out all of the staples that held the straps on.
It took all of 2 minutes. 

Then, I headed outside to give her a new look...
First, I sprayed 2 coats of primer. 
She was thirsty!! 

The wood grain just kept coming through, so I grabbed a can of white paint & brushed on a couple of layers. It worked! 

After it dried I just sprayed a few coats of white paint to make the finish smooth. 

I used webbing for the straps. It's durable, substantial & cheap.
The only thing I didn't like was the red strips. 

Enter the green ribbon!
Using invisible thread, I sewed along one edge & then sewed the other side, so that it won't come off easily.


Splendiferous.

Using the old straps, I measured out three new straps with about an 1 in. extra (so I could fold over the edges so that they wouldn't unravel). 
Once they were measured & cut, I simply stapled them onto the stand!
Easy as pie.
(Yes, I realize I didn't sew ribbon on the back side, but I figured it wouldn't show much anyways... and my time is better spent somewhere else... such as packing. Ugh.)
Now, for some after pics!
Look at those shapely legs!

Isn't she a beaut?!

L.O.V.E


Hope you found this post a wonderful surprise and not a let down!
I certainly enjoyed this lil' project! 

Thursday, November 11, 2010

Teaser

Well hello! 
I just got back from a day of thrifty shopping! I am very excited about my next upcoming project.
Here's a look into what my next transformation will be...
Can you guess what it is?? 
Keep checking back for this fun re-do next week. :)
See you then!

Wednesday, November 10, 2010

Make your own cloche!

So... do you like this??

Or maybe this...
I sure do! But I certainly do NOT like the price tags attached to them. 
($199.89 & $79.99 = OUCH)

Don't worry, you can make them for a fraction of the price. 
Once again you'll just need a few random pieces. 
You can usually find a glass cheese dome or glass dome at your local Goodwill store. Just keep an eye out for one. 
You can use a regular plate, silver plate or perhaps a wooden cheese plate for the plate.... the options are endless!! 
If you want, you can add a candle holder to the bottom to raise it in the air a bit. 

Introducing my pieces...
Silver plate = $1
Glass dome = $3.50
Metal candle holder = $1
Yep. A grand total of $5.50! Boom baby! :)

Now, for the easy peasy directions.
Using a STRONG glue (I used Gorilla glue), glue your "plate" to the base. 
Once the glue has dried. All you have to do it paint it. The possibilities are endless! 

My final product:
How fun the holidays will be! Wouldn't some Christmas ornaments look fabuloso?!